Vite 搭建项目
搭建 Vue3
# npm install -g create-vite-app
# npm init vite-app
# 上面这种已经过时了
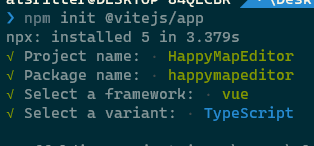
npm init @vitejs/app <project-name>
# 如果有模板可以直接用模板
# npm init @vitejs/app <project-name> --template
cd <project-name>
npm install
npm run dev
再安装 TS(如果已经选择 TS 模式就不用配置了)
npm i -S typescript
配置 TypeScript
npx tsc --init创建tsconfig.json文件- 把根目录下的
main.js文件改名为main.ts - 把根目录下的
index.html中引入的main.js改名为main.ts - 同时把
.vue文件里的<script>标签中加入lang="ts" - 在项目根目录创建
shim.d.ts文件,同时在其中写入以下代码,用于配置 ts 支持识别.vue文件
declare module "*.vue" {
    import { Component } from "vue";
    const component: Component;
    export default component;
}
其中 tsconfig.json 文件的常用配置
{
  "compilerOptions": {
    // 允许从没有设置默认导出的模块中默认导入。这并不影响代码的输出,仅为了类型检查。
    "allowSyntheticDefaultImports": true,

    // 解析非相对模块名的基准目录
    "baseUrl": ".",

    "esModuleInterop": true,

    // 从 tslib 导入辅助工具函数(比如 __extends, __rest等)
    "importHelpers": true,

    // 指定生成哪个模块系统代码
    "module": "esnext",

    // 决定如何处理模块。
    "moduleResolution": "node",

    // 启用所有严格类型检查选项。
    // 启用 --strict相当于启用 --noImplicitAny, --noImplicitThis, --alwaysStrict,
    // --strictNullChecks和 --strictFunctionTypes和--strictPropertyInitialization。
    "strict": true,

    // 生成相应的 .map文件。
    "sourceMap": true,

    // 忽略所有的声明文件( *.d.ts)的类型检查。
    "skipLibCheck": true,

    // 指定ECMAScript目标版本
    "target": "esnext",

    // 要包含的类型声明文件名列表
    "types": [

    ],

    "isolatedModules": true,

    // 模块名到基于 baseUrl的路径映射的列表。
    "paths": {
      "@/*": [
        "src/*"
      ]
    },
    // 编译过程中需要引入的库文件的列表。
    "lib": [
      "ESNext",
      "DOM",
      "DOM.Iterable",
      "ScriptHost"
    ]
  },
  "include": [
    "src/**/*.ts",
    "src/**/*.tsx",
    "src/**/*.vue",
    "tests/**/*.ts",
    "tests/**/*.tsx"
  ],
  "exclude": [
    "node_modules"
  ]
}
配置路由
引入 Router 4
# 默认加 --save 参数的(注意要加后面的 @4)
npm install vue-router@4
在 src 下建立 router 目录并在其中创建 index.ts 文件,并在其中写入(此处的地址为自己在根目录创建 views 文件夹下创建 index.vue 文件,可根据自己需要创建)
// Router 4.x
import { createRouter, createWebHashHistory, RouteRecordRaw } from "vue-router";
const routes: Array<RouteRecordRaw> = [
  {
    path: "/",
    name: "Home",
    component: () => import("../views/Home/index.vue"),
  },
  {
    path: "/login",
    name: "Login",
    component: () => import("../views/Login/index.vue"),
  },
];
const router = createRouter({
  history: createWebHashHistory(),
  routes
});
export default router;
Router 4.x 中为我们提供了 createWebHashHistory 与 createWebHistory 方法设置哈希模式与历史模式。
const router = createRouter({
  history: createWebHashHistory(), // 哈希模式
  history: createWebHistory(), // 历史模式
});
修改 main.ts 文件引入 vue-router
import { createApp } from 'vue';
import App from './App.vue'
import './index.css'
import router from "./router/index";

createApp(App).use(router).mount('#app')
添加 Less 支持
npm i -D less
npm i -D less-loader
vite 使用less 必须要将 package.json 中的 less 和 less-loader 写在 devDependencies 里面

导入 Vuex
安装 Vuex 4
npm install vuex@next --save
src 目录下新建 store/index.ts
import { createStore } from 'vuex'

const store = createStore({
  state: {
    userInfo: {
      name:'alsritter'
    }
  },
  mutations: {
    getUserInfo (state, name) {
      state.userInfo.name = name
    }
  },
  actions: {
    asyncGetUserInfo ({ commit }) {
      setTimeout(() => {
        commit("getUserInfo", +new Date() + 'action')
      },2000)
    }
  },
  getters: {
    userInfoGetter (state) {
      return state.userInfo.name
    }
  }
})

export default store
再在 main.ts 里面引入
import { createApp } from 'vue';
import App from './App.vue';
import router from './router/index';
import store from './store';

createApp(App).use(router).use(store).mount('#app');
引入 ESlint
npm i eslint vue-eslint-parser eslint-plugin-vue -D
npm i @typescript-eslint/parser @typescript-eslint/eslint-plugin -D
eslint:ESLint的核心代码
@typescript-eslint/parser:ESLint的解析器,用于解析 Typescript,从而检查和规范 Typescript 代码
@typescript-eslint/eslint-plugin:这是一个 ESLint 插件,包含了各类定义好的检测 Typescript 代码的规范
上面这一块,其实可以直接使用
eslint --init
这个命令来选择初始化环境的
结合 Prettier 和 ESLint
npm i prettier eslint-config-prettier eslint-plugin-prettier -D
prettier:prettier 插件的核心代码
eslint-config-prettier:解决 ESLint 中的样式规范和 prettier 中样式规范的冲突,以 prettier 的样式规范为准,使 ESLint 中的样式规范自动失效
eslint-plugin-prettier:将 prettier 作为 ESLint 规范来使用
eslint 配置如下:
生成的默认配置如下:
module.exports = {
    "env": {
        "browser": true,
        "es2020": true
    },
    "extends": [
        "eslint:recommended",
        "plugin:vue/essential",
        "plugin:@typescript-eslint/recommended"
    ],
    "parserOptions": {
        "ecmaVersion": 11,
        "parser": "@typescript-eslint/parser",
        "sourceType": "module"
    },
    "plugins": [
        "vue",
        "@typescript-eslint"
    ],
    "rules": {
    }
};
修改为:
module.exports = {
  root: true,
  env: {
    browser: true,
    es2021: true,
    node: true
  },
  /* 指定如何解析语法。可以为空,但若不为空,只能配该值,原因见下文。*/
  parser: 'vue-eslint-parser',
  /* 优先级低于parse的语法解析配置 */
  parserOptions: {
    parser: '@typescript-eslint/parser', // Specifies the ESLint parser
    ecmaVersion: 2020, // Allows for the parsing of modern ECMAScript features
    sourceType: 'module', // Allows for the use of imports
    ecmaFeatures: {
      // tsx: true, // Allows for the parsing of JSX
      jsx: true
    }
  },
  /* 扩展配置,加一些插件 */
  extends: [
    'plugin:vue/vue3-recommended',
    'eslint:recommended',
    'plugin:@typescript-eslint/recommended', // typescript-eslint推荐规则
    //'prettier/@typescript-eslint', // 使得@typescript-eslint中的样式规范失效,遵循prettier中的样式规范
      'prettier', // 上面那个插件归类到这里了
    'plugin:prettier/recommended' // 使用prettier中的样式规范,且如果使得ESLint会检测prettier的格式问题,同样将格式问题以error的形式抛出. 确保在最后一个.
  ],
  rules: {}
};
.prettierrc 配置如下(注意,到时要删除注释):
{
  "printWidth": 160, // 单行输出(不折行)的(最大)长度
  "tabWidth": 2, // 每个缩进级别的空格数
  "tabs": false, // 使用制表符 (tab) 缩进行而不是空格 (space)。
  "semi": true, // 是否在语句末尾打印分号
  "singleQuote": true, // 是否使用单引号
  "quoteProps": "as-needed", // 仅在需要时在对象属性周围添加引号
  "bracketSpacing": true, // 是否在对象属性添加空格
  "jsxBracketSameLine": true, // 将 > 多行 JSX 元素放在最后一行的末尾,而不是单独放在下一行(不适用于自闭元素),默认false,这里选择>不另起一行
  "htmlWhitespaceSensitivity": "ignore", // 指定 HTML 文件的全局空白区域敏感度, "ignore" - 空格被认为是不敏感的
  "trailingComma": "none", // 去除对象最末尾元素跟随的逗号
  "useTabs": false, // 不使用缩进符,而使用空格
  "jsxSingleQuote": false, // jsx 不使用单引号,而使用双引号
  "arrowParens": "always", // 箭头函数,只有一个参数的时候,也需要括号
  "rangeStart": 0, // 每个文件格式化的范围是文件的全部内容
  "proseWrap": "always", // 当超出print width(上面有这个参数)时就折行
  "endOfLine": "lf" // 换行符使用 lf
}
配置多环境
参考官方文档,多环境打包
就像后端那样分多个环境,发布,测试,开发
Vite 使用 dotenv 从你的 环境目录 中的下列文件加载额外的环境变量:
.env                # 所有情况下都会加载
.env.local          # 所有情况下都会加载,但会被 git 忽略
.env.[mode]         # 只在指定模式下加载
.env.[mode].local   # 只在指定模式下加载,但会被 git 忽略
package.json 中配置 dev 环境的打包命令,在 vite build 后加上 --mode dev 来区分打包环境
之后在项目中即可通过以下方式获取到配置的环境变量,以区分不同的环境
console.log(import.meta.env.VITE_PROJECT_ENV);